
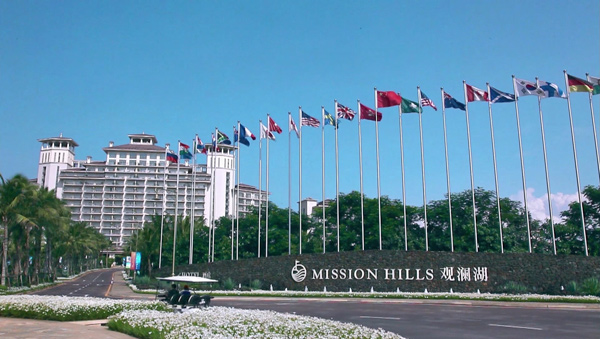
The crown jewel of the Mission Hills Golf Club is the Blackstone Course, a spectacular 350 acre core golf course that weaves through a striking landscape of mature trees, thick jungle vegetation, and expansive lakes and wetlands. The dominating site characteristic is the bed of lava rock which was capped with material located 25 miles away.
Related Link: Ahmad Rashad: Tiger and Rory’s Rematch in China
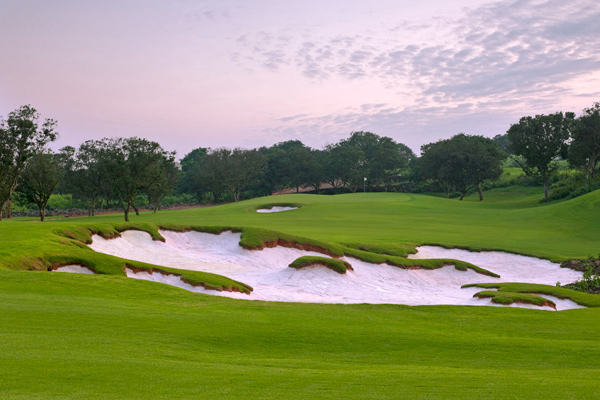
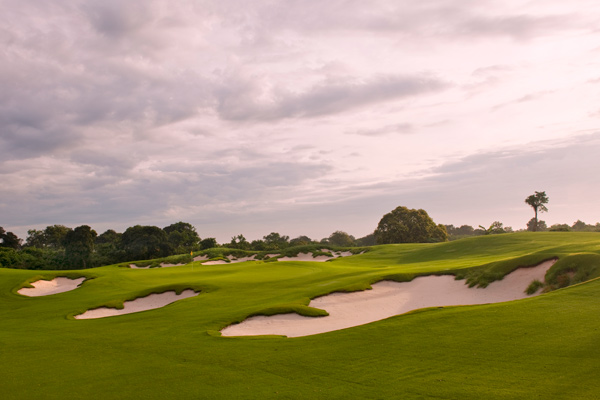
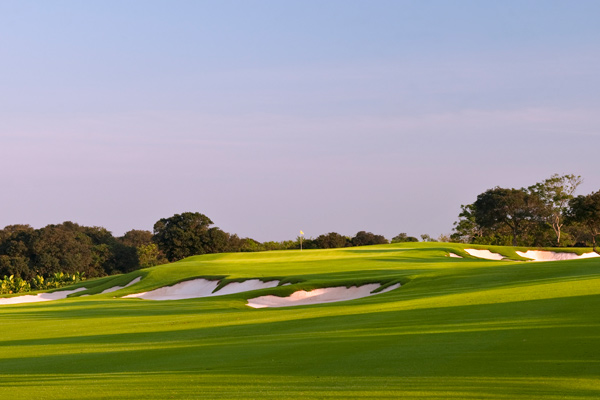
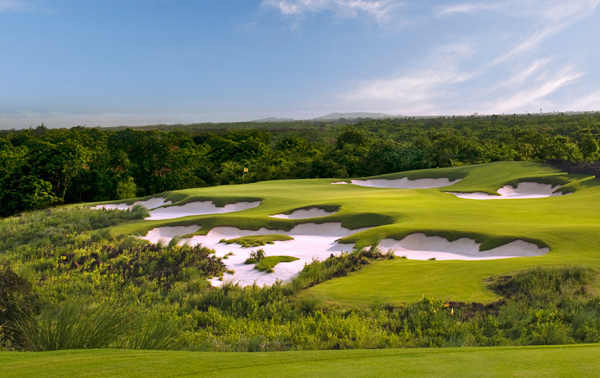
The naturally rolling terrain sees dramatic elevation change and great care was taken to find as many natural holes as possible to avoid cutting the rock and to preserve the magnificent Lychee trees. The lava rock base has been incorporated as an integral element of the design by weaving irregular lines of turf and rock, eliminating the typical hard line edge of most courses. Adding to the look are wild, irregular bunker edges and transitional sand edges that effortlessly work into native lava rock.
Fairways sweep across the landscape conforming to the natural terrain with an emphasis on surface drainage rather then contained low drain inlets. The result is a magical blanket of turf with soft irregular edges and a lack of hard lines as there is only fairway cut (no rough, even at bunker faces). The lava bed is incorporated into forced carries creating dramatic contrast and the lava rock walls and village ruins created years ago remain as a testament to the site’s past.
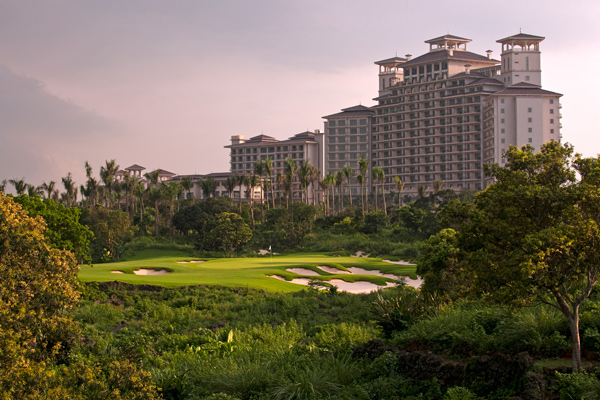
The course begins in the more heavily wooded portion of the property with a wide variety of hole lengths and natural amphitheater green settings. The final holes play in and out of a hub of raised terrain that allows spectacular views of the closing holes with little need to move. Easy green to tee relationships and easy terrain render the course very walkable.
Related Link: Tiger Woods, Rory McIlroy Set For 1-on-1 Rematch in China
Difficult, long (at over 7,800 yards) and with risk/reward opportunity at the final holes, this course should prove to be one of the premier tournament courses in the world today. Great effort was made to provide not only a great tournament golf course but extensive planning and construction has created support facilities capable of hosting big events with the greatest of ease.
Hole-By-Hole Description
Hole #1
428 Yards Par 4
A fairly easy opening tee shot to a wide fairway offering options for aggressive players who choose to confront rugged bunkering. The green is perched above a ridgeline with bunkers in front and a severe drop-off long. Relatively easy to hit with a lofted club but quite a challenge for drives played safely short and left. An abundance of lava stone immediately announces you are opening play on a very unique course.
Hole #2
623 Yards Par 5
A true, three-shot double-dogleg par five that will reward players with a wedge approach properly negotiating the first two shots. The tee shot swings right to left around a series of long transition bunkers to a spacious fairway that quickly narrows for longer hitters. A massive series of bunkers some 100 yards long sits well below the main second-shot landing area. Pinnable flat sections on the green are separated by distinct slopes making putting difficult if in the wrong area.

Hole #3
462 Yards Par 4
Offering multiple tee options, the drive must hold the center of the crowned fairway or risk falling off sharply to the right. A huge bunker cuts off the turn for longer players so most second shots will come from about 150 yards. The unique green features a reasonably flat right side with a strong, long ridge over the left third that will rapidly repel balls to the left and down. A wonderful natural amphitheater surrounds the putting surface.
Hole #4
518 Yards Par 4
Perhaps the most difficult hole on the entire course, this long par four demands a big carry off the tee over a deep ravine. A series of fairway bunkers left punish errant drives, and balls to the right drop down a severe slope leaving a blind second shot. The green incorporates a fall away slope that will gently guide approaches properly played up the left side. Par here is quite an accomplishment.
Hole #5
172 Yards Par 3
A relatively short but treacherous hole surrounded by deep rock lows. The center of the green is the smart play, as it offers a distinct lobe and pronounced backstop. The upper right and back left sections may only be attacked by well-struck shots or else disastrous results will occur. Be content with a three and move on.
Hole #6
599 Yards Par 5
Off the tee, 180 yards of sand guards the left side but over 75 yards of fairway is available right. The upper plateau of the second landing area is protected by an expanse of deep bunkers and marshland right. Long tee shots will set up a tempting run at the green in two, but a daunting carry to an elevated green demands premium shot making. Short-iron play from the upper plateau is the preferred option, but must find the proper zone of the green to avoid awkward, long putts.
Hole #7
398 Yards Par 4
This short par four offers three options off the tee to avoid a centerline pot bunker — over, short or right. Left is not ideal, as an ancient rock wall ruin will swallow drifting shots, with trees also posing problems. The small, undulating green is tucked behind a cluster of Lychee trees. One of the easier holes on the course if negotiated properly.
Hole #8
192 Yards Par 3
A medium-length par three with a well-bunkered, reasonably flat green nestled in a natural amphitheater of stone and mature Lychee trees. An expanse of lava rock surrounds the tees and first half of the hole but is out of play despite its intimidating look. Presents more bark than bite.
Hole #9
511 Yards Par 4
This long par four is very demanding despite a massive breadth of fairway off the tee. Long tee shots may catch a steep speed slot that propels balls forward leaving a second shot from about 175 yards. The heavily-bunkered green is highlighted by a feeder slope to access right-side pins. Four here is very good.
Hole #10
402 Yards Par 4
Plays uphill to a perched landing area. Tee shots should not be too bold, as the fairway quickly drops off sending balls toward the rock hazard. The green is cut at a strong right-to-left angle and protected front by a large, intimidating bunker. Accurate drives will set up short-iron seconds, but carelessness will yield very difficult approaches from awkward stances and fairway bunkers.
Hole #11
227 Yards Par 3
A treacherous test from elevated tees, this par three requires a draw into a deep green set right to left around a yawning bunker. Bail-out fairway can be found right, but deft touch is required to negotiate the putting surface’s mounded right edge.

Hole #12
532 Yards Par 5
Sweeping right to left, this reachable par 5 offers a generous fairway, favor the left side but avoid trouble with a large sandy expanse and single mature Lychee tree. Cross bunkers set up the second shot and the elevated, undulating green is one of the course’s most difficult.
Hole #13
681 Yards Par 5
The second of back-to-back par five’s is a beast. Extremely long yet wide open, play should hug the left side as much as possible. This is especially true on second shots as approaches must avoid a tree about 120 yards from the green in the fairway’s right center. Properly played, an unobstructed short- or mid-iron will be left to a fairly easy green surface guarded by a solitary bunker. It’s the only hazard on the entire hole yet par will be happily accepted by all.
Hole #14
474 Yards Par 4
Turning strongly from left to right, this long par four offers ample fairway but trees dictate proper placement. The second shot plays to a backdrop of stone and bunkers. A steep fall-off right will punish errant approaches. The green’s prominent contours make putting a challenge, especially to back pins.
Hole #15
211 Yards Par 3
A beautiful hole requiring a long carry over rock lows and sandy expanses to a green framed by bunkers. Back left pins are only accessible with a finessed, softly-drawn tee shot. Windy conditions, exacerbated by the hole’s exposed location, make par a score to be celebrated.
Hole #16
386 Yards Par 4
A drivable par four for some offering many options off the tee: take aim directly at the green — and carry the length of a large lake — for bombers; left of the green for the more cautious; and left of the fairway bunkers for shorter hitters. All second shots should be no more than wedges, but severe slopes and deep bunkers protect the green. This hole can yield small and big numbers.
Hole #17
453 Yards Par 4
Requires two precise shots. Drives must be long enough for prime positioning, but must hit the brakes as a lava stone swath cuts through the hole about 125 yards short of the green. The small putting surface is defended by wetlands and numerous bunkers, but the back pin can be attacked by feeding balls down a slope. Four is an excellent score.
Hole #18
539 Yards Par 5
The daunting tee shot features a lengthy carry over marshland and lava rock. Long and accurate off the tee is a must if you want to reach this green in two. The approach shot plays to a green set just above the lake edge, smart play from the left can use contours to funnel the ball to the green. A picturesque backdrop of trees, sand and the enormous clubhouse is both intimidating and memorable. Stay focused through the green and conclude the round on a high note.
The Asia Pacific Golf Group has been in operation since 1998 and has grown to cover every aspect of the golf industry in the Asia region. For everything on golf, there is no better source than the Asia Pacific Golf Group.

Related Link: Tiger Woods and Nike: A Look Back | 11 Best Nike Commercials
Other Hot Links:
– Dammit Tiger, Curse Away!
– 18 Great Golf Apps For Your iPhone 5S or 5C
– 13 Most Memorable Moments from PGA Tour’s ‘Regular Season’
– Flashback: Jason Dufner’s Bizarre Photo Starts Internet Craze

